Category: Fixes For

Personal collection of notes about how to complete certain mundane and obscure tasks without needing to track syntaxes or extracting only the specific information for a tasks from much bigger sets.

  • Using bridge mode with IPoE and pfSense or OpenWRT (how to)

    Using bridge mode with IPoE and pfSense or OpenWRT (how to)

    In modern TR-069-fied CPEs (Customer Premises Equipment) this involves several steps, most of it is preparation.

    TLDR

    If you already have the device in bridge mode and you are only trying to figure out how to do IPoE skip to 3.2, or if already sorted that out too and you’re looking for how to keep the connection from going offline 3.2.2.

    Table of contents

    • TLDR
    • Table of contents
    • 1. Recon
    • 2. Redo
      • Preemptive tips
    • 3. Rework
      • 3.1 PPPoE
        • 3.1.1 MSS Clamping
      • 3.2 IPoE
        • 3.2.1 WTF is IPoE?
        • 3.2.2 [Re-]Authentication
        • 3.2.3 Lorem ipsum dicpic das un (that’s French for “let’s finish this”, I heard in a lie I told)

    AD SPACE

    ESPAÑOL? (do you like taquitos?)

    La versión original de esta página era de hecho en español. Está enfocada al proveedor mexicano Megacable (servicio de fibra) en su mayor parte, pero no hay razón por la que no se pueda aplicar a similares.

    (…just kidding.)

    And if we bye-bye and VyOS that firewall?

    If you’re comfortable in the CLI, this might be a great time to check out VyOS. It’s among the best firewall/routing platforms I’ve tried, it’s blazing fast. Although personally I haven’t checked it out yet but there’s a high chance it’s got a fix for this already, considering it has an IPoE server out of the box. I kept my most recent VyOS firewall and I already starting the switch back to it to test this. I’ll update this post if there’s unusual that you’d do on a “regular” DHCP WAN uplink. Also good are CHR from Mikrotik (a perpetually1 licensed virtualized version of its RouterOS routing platform starting at about USD50,) and a bit bloated and slower but still good, OPNsense which like VyOS and pfSense, has professional support options too.

    1. Recon

    1. Reset the ISP-loaned toaster to its defaults using the little pin hole or what-have-you.
      • If you have admin access printed in the box, log in.
      • If you have one of those ISPs that requires you to have their blessing to get “admin access,” you’ll have to dial the number and put up with the condescending questionnaire in order to get those credentials. Remember they might expire so log in right away.
    2. The CPE uses profiles for the connection, they’re not called that but probably something more confusing or mistranslated. Several profiles at once might be configured but only one is online. Unless it only handles one stack (i.e. IPv4, IPv6), then two. Locate the active one, expand it if no already and note down the settings so you can create your own profile after. Some key points:
      • A profile will have a series of checkboxes for “Service Type”. The options will be something like: Internet, Voice, Other, TR-069, IPTV
        • When you create your own, you only need — and should only select — “Internet”.
    3. It will have the authentication type, normally PPPoE or IPoE. The latter could be named just DHCP, or “dynamic”. If it’s PPPoE, you should know the username, and password. Basically the most important thing to learn from here is the authentication type, also called connection type (not so much the credentials,) and the WAN-side VLAN the servers you need to contact reside on.
    4. For older DSL types, take note of the VPI and VCI values. This will be really rare in modern-ish networks though. If you see these values, you won’t see/need the VLAN value.
    5. Next, find out your WAN-side MAC address, it should be on the status page for Internet, WAN, or even the ONT/OLT link details page.
    6. If you are replacing or have replaced your fiber ONT, in the ONT/OLT link details/status page, find out what serial number your ONT is using. If it needs a password, see if you can get it from the UI, otherwise you will have to phone support. Sometimes it’s just a mistakenly entered password we ourselves entered that’s not even considered to accept the ONT registration with the OLT.

    2. Redo

    Start by finding the TR-069 section on disable it. Hopefully your ISP doesn’t have fail safes for it to be re-enabled on its own, but let’s face it; that admin access account, is not a root account. You are powerless until you get your own ONT/modem.

    2.1 Two point one and CPE tips

    Set up a static address on your computer on the same subnet of the CPE in preparation for bridge mode, some really crappy CPEs still lose all access upon enabling bridge mode, but most simply turn off DHCP.
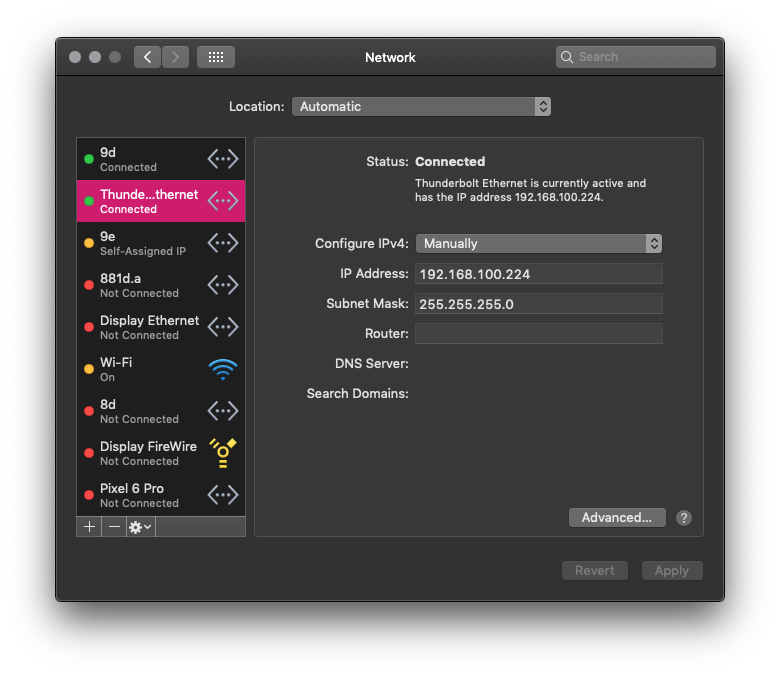
    You don’t need a full network config. In the picture, the interface is configured with lower priority so the main interface (a VLAN in this case) still allows Internet access for whatever that might come up.

    Additionally, it’s imperative to use plenty of lube but not too much that it gets sloppy. Sure, it’s unrelated but it never hurts to know. You know what hurts though? No lube! Back to subject.

    You will have to learn and adapt. That means, pay attention to the order of the steps as you take them, if it locks you out at a given step, then next time leave it for the end. Always wait a little to see the outcome, the CPE might have an config auto-revert if the connection with your browser is lost for too long, or it may have a confirmation step. Watch the lights on the CPE, identify the pattern of normal operation. At the same time, don’t wait for too long because the session will expire due to inactivity, or because it has a hard limit. Knowing how shortsighted ISPs are, it will be most likely the latter.

    Open private sessions on the browser, each window is a new session whereas in normal browsing all windows are your current session. It really depends on how well the site is put together, don’t expect miracles and don’t close the original window even if you get an error page. You can at least use it to get the history of addresses where settings are on the CPE. Probe often the CPE from other sessions after you applied some change and it started taking a little too long to respond; if it takes long to respond in another session as well, it means it’s working on it. Do it carefully. The bad code in these cheap devices might make them crash when overtaxed. On the other hand, if it responds right away it means that it probably has already applied the changes but, also due to bad code, it failed to acknowledge it. Double check just in case, navigate to another page and back. Keep the dev tools open of your browser with the option to disable cache enabled.

    If you get locked out due to too many invalid password attempts, change the static IP address of your system and open a new private session.


    This is the part where bridge mode is set in the CPE.

    • Delete all WAN profiles
    • Create your own WAN with the settings you gathered, except:
      • Set it on bridge mode (rather than choosing PPPoE, IPoE, static, dynamic, …)
      • Bind it (bridge it) to all LAN ports or just the one connected to your firewall, your call.
      • Don’t forget the VLAN.

    2.1 Disable extras

    Now it’s time to do a little housecleaning on your CPE, especially if it’s the kind that will rotate its credentials.

    Go to the Wi-Fi settings and turn it off. Turn everything off. Since you won’t be using it, it’s only creating interference for yourself and others. Then navigate through all pages and turn off everything that you can turn off: all firewall “protections,” all access controls, UPnP, built-in media servers. Everything must go. You want all limited resources bridging traffic period.

    “But the firewall too?”

    Yes. What do you think it’s going to happen if the device has no routable address?

    “But what if somebody in the ISP’s internal network… since it’s layer 2 on that side, ain’t it?”

    Yes, and no. Yes, young padawan, it’s usually layer 2 on the WAN side, hence why you bridge to it, but that doesn’t mean you’re with other customers in the same broadcast domain. WAN side switching is a bit different than LAN-, or even ultra-badass datacenter TOR switching, or other LAN fabric. ISPs need no MAC addresses or packet/frames headers to direct traffic. They use locally significant connection identifiers over a fixed path. These fixed path constructs are called switched virtual circuits when set by a signaling protocol or permanent virtual circuits when set manually. They create a logical association of two endpoints, which can make it as if there was nothing else in the network—if I remember correctly. Point is, I’m really digging in within the deepest of my geek reserves (and depleting them, I’m gonna need to read book or cereal box after this) to come up with this lame half answer. Just take it.

    If that doesn’t convince you, remember that you are setting up your own firewall, even if ISP-loaned panini maker gets compromised; whatever, it’s out of your perimeter.

    3. Rework

    Now you only need to adapt and apply the rest of the settings to an interface in your firewall. This should be easiest, and — if you use IPoE — the most important part.

    3.1 PPPoE

    For PPPoE, I need to explain nothing. However…

    3.1.1 MSS clamping

    I do recommend that you set MSS clamping though. If you’re handling both IPv6 and IPv4 on the same interface, set the value at the most to 1432. Depending on your ISP it might be even less. If it’s only handling IPv4, set it for 1452 at the most. Start using this value network wide, it’ll avoid so many issues.

    Just as a refresher:

    IPv4IPv6HE Tunnelbroker IPv6
    Packet size on the Internet150015001500
    PPPoE header888
    IPv4 header20
    20
    IPv6 header (covers IPv4, unless in IPv4)
    4040
    TCP header202020
    Remaining for payload145214321412

    On the ‘senses2, this is done in the interface config. Just below you select what kind of interface it will be and below MTU (which is best to leave blank unless you really know what you’re doing)… like really really.

    Note that MSS will always be lower than MTU. That doesn’t mean that if you set MTU the other is limited automatically. Some firewalls might, but don’t expect it. MSS clamping is an aid, it happens as a conversation between the firewall and a another TCP endpoint. MTU thought it happens to be mentioned in machine-to-machine conversation as well, it might just, y’know…not. It’s a hard limit, well sort of, it auto-adjusts in many cases but I don’t know the specifics. Sorry! One last thing, pinging itself uses the ICMP protocol, with overhead of 8 bytes. During ping it’s not counted but when ping exits, it add them back to the report printed.

    3.2 IPoE

    3.2.1 WTF is IPoE

    When I first read about IPoE, I was “IP over Ethernet, hmm… Sounds like something that was already happening, right? Oh well.” but as I learned a little more about it, namely that IPoE is an authentication method that uses MAC addresses to assign IP addresses… “Seriously!?— What is wrong with these people!”

    But as it turns out is more advanced than DHCP it seems (it’s not).

    It’s basically a glorified DHCP server that may or may not have (it never has) TLS extensions. What for? Who cares. The thing you need to know is that when you set a client, or rather WAN interface in a firewall platform that has no specific IPoE option, you need to use DHCP. That will be a lot of them because only CPEs, which are cheap and what we’re trying to replace, have the IPoE option.

    This is necessary regardless if you have a static IP address, during the last steps of DHCP’s DORA or what’s-her-name, the request is what’s used as trigger for authentication, then with the acknowledgement comes the authorization and then the client is allowed to exchange data.

    You’re not done yet though.

    3.2.2 [Re-]Authentication

    Since the DHCP address leasing process serves as the authentication/authorization mechanism, you sort of need to do it all over again before authorization expires, likely before the lease. Normally DHCP checks (refreshes) with the server when half of the lease is up. If the server doesn’t answer, then halves the time again so at ¾ the lease checks again, rinse and repeat until finally it releases the lease if the server failed to pick up.

    I wasn’t planning on bothering with detail, but this thing is for myself as well, it’s my personal3 notes if you will, and I’d hate not knowing, on top of that I must’ve stumbled into a version of the RFC “for dummies” because it was very straightforward to understand. Like a dangling **** in my face, I seized it.

    The DHCP message for both requesting and refreshing (extending) an lease is the same one, DHCPREQUEST, I’m not kidding, I went to investigate and I just came back all the way from the farthest tab to the → (I think that’s right according to the shoulder buttons on my Nintendo.)

    DHCPREQUEST is actually used in four different occasions. Let’s just focus on the two involved.

    DHCPREQUEST / SELECTING

    The client may catch a few DHCPOFFER messages and select the best offer. If nothing is suitable, it might send another DHCPDISCOVER message, blah-blah… This DHCPREQUEST is a broadcast message, it must include the server’s IP address, it must include the requested IP address, and not include the client’s IP address.

    DHCPREQUEST / RENEWING

    The client maintains two times, T1 and T2, that specify the times at which the client tries to extend its lease on its network address…blah-blah… At time T1 the client moves to RENEWING state and sends (via unicast) a DHCPREQUEST message to the server to extend its lease. The client sets the ciaddr (its own address) in the request, and must not include the server’s address nor the requested address.

    In summary:

    DHCPREQUEST during…SELECTINGRENEWING
    Transmission typebroadcastunicast
    Includes server’s address?✔︎✖︎
    Includes requested address?✔︎✖︎
    Includes client’s address?✖︎✔︎

    That process doesn’t seem to be quite enough for authorization to happen though. During testing, although with only one ISP, what has been observed is that the client will eventually lose authorization but it won’t be until the lease is up (which is longer than the authorized time) and starts what’s-her-name all over again become authorized again. This is not too different from restarting the interface.

    And indeed it worked. The regular process of address renewal just doesn’t cut it to authorize the client in IPoE. Restarting the interface would will reauthorize the client right away.

    The problem is that if you have a dynamic IP address, the change of it would mean routing tables need to be flushed, connection states need to be cleared, which would then force connections to be reestablished. It’s a noticeable hiccup in the network. Not a big deal for humans, but what if you have big non-resumable transfers in progress? And by you, I mean you as a server, since I assume if you’re doing all of this you might be self-hosting something, which if you do, it means you’re likely not bandwidth-constrained, but what about your clients4 though?

    There is one way that seemed to be working flawlessly in triggering the DHCPDISCOVER in order to get to the DHCPREQUEST/SELECTING, without restarting the interface: bringing the interface up when it’s already up (without bringing it down first.)

    As I mentioned one or two dozen times, I have a static IP address to test with only. I’m always getting the same address even if it needs to be requested as a dynamic assignment, therefore there’s not flushing or clearing of anything, and not all DHCP servers rotate their addresses right away, in my experience with them, they’d usually re-offer the same address if the lease is still valid and the client never released it.

    I had always had PPPoE before, from ADSL all the way to VDSL2 and GPON, I’ve always used bridge mode. This IPoE stuff was foreign territory. The service would cut off every day at about the same time if the interface wasn’t restarted, it would just be continue playing dead.

    It wasn’t really a mystery of what would work because the ISP used to be a cable provider (coax) before all of them converted to fiber, I’ve heard/read that spoofing the MAC address is common practice with cable and that generally cable uses DHCP so I could put two and two together.

    However, because of that stupid static address, I wanted to make sure there was absolutely no chance of setting it up manually before bending over and praise the lord.

    And to really really really make sure I covered all bases, I ordered my own ONT a repeated everything I had tried so far. You know how the saying goes “keep your enemies close and the lube closer” or something like that.

    The thing is, on IPoE, there’s no session monitoring. If you got authorization earlier and your [spoofed] MAC address matches, as well as your [also spoofed] ONT serial number, all will work if you set it to manual because you’re already authorized. I kinda thought that would happen but the only way to confirm was waiting a day. When eventually authorization expires at which point you’ll end up offline and with absolute no chances of reconnecting since DHCP is not happening.

    I’m intentionally making mistakes so you don’t have to. It’s really so I don’t have to but it doesn’t sound as altruistic.

    If you do have a static address, beware of false positives successes

    Now, for something useful.

    3.2.3 Lorem ipsum dicpic das un (that’s French for “let’s finish this”, I heard in a lie I told)

    If you’re using OpenWRT, the solution to this is to set a cron job to bring up the interface constantly. In the scenario I had to test, I will always get the same address. There’s no disruption, if there even is supposed to be some, setting it for an hour ended all problems.

    In LuCI, the GUI for OpenWRT, in SystemStartupLocal Startup

    */60 * * * * /sbin/ifup local4

    You might not have an environment when cron jobs are executed. You can’t rely on the PATH, in other words, you must enter the path in full.
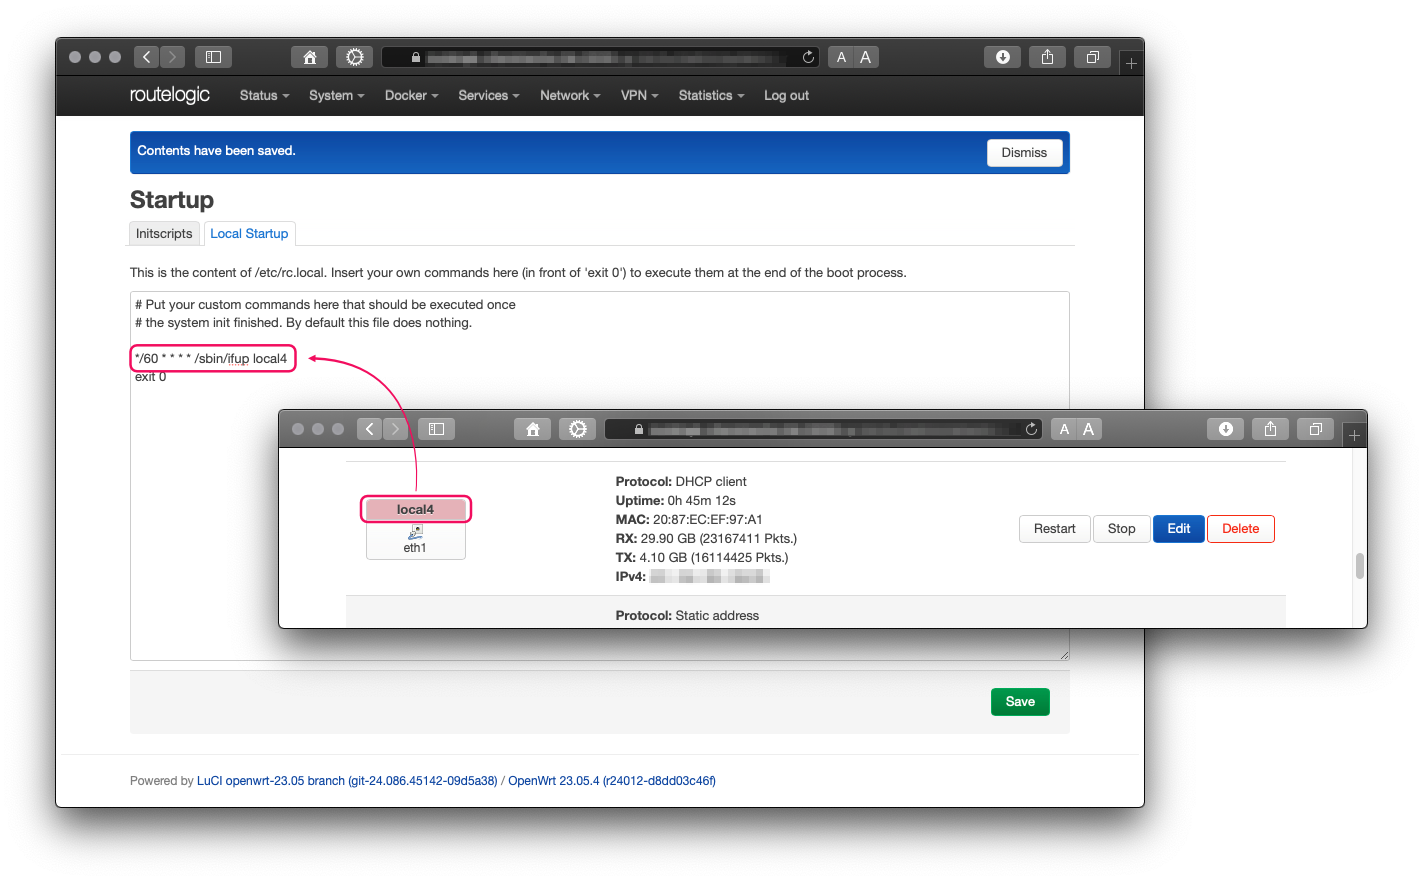
    The interface names is what you set it to be in the config, not the BSD-ish one.

    Which BTW, you can get with: ip link | grep -Ei '^\d+:.*' | awk '{print $2}' | grep -Eo "(\w|.|\d|\@)+" — again, not for the ones you actually need, just a tip.

    And as always to find the location of a program use which:

    which ifup/sbin/ifup

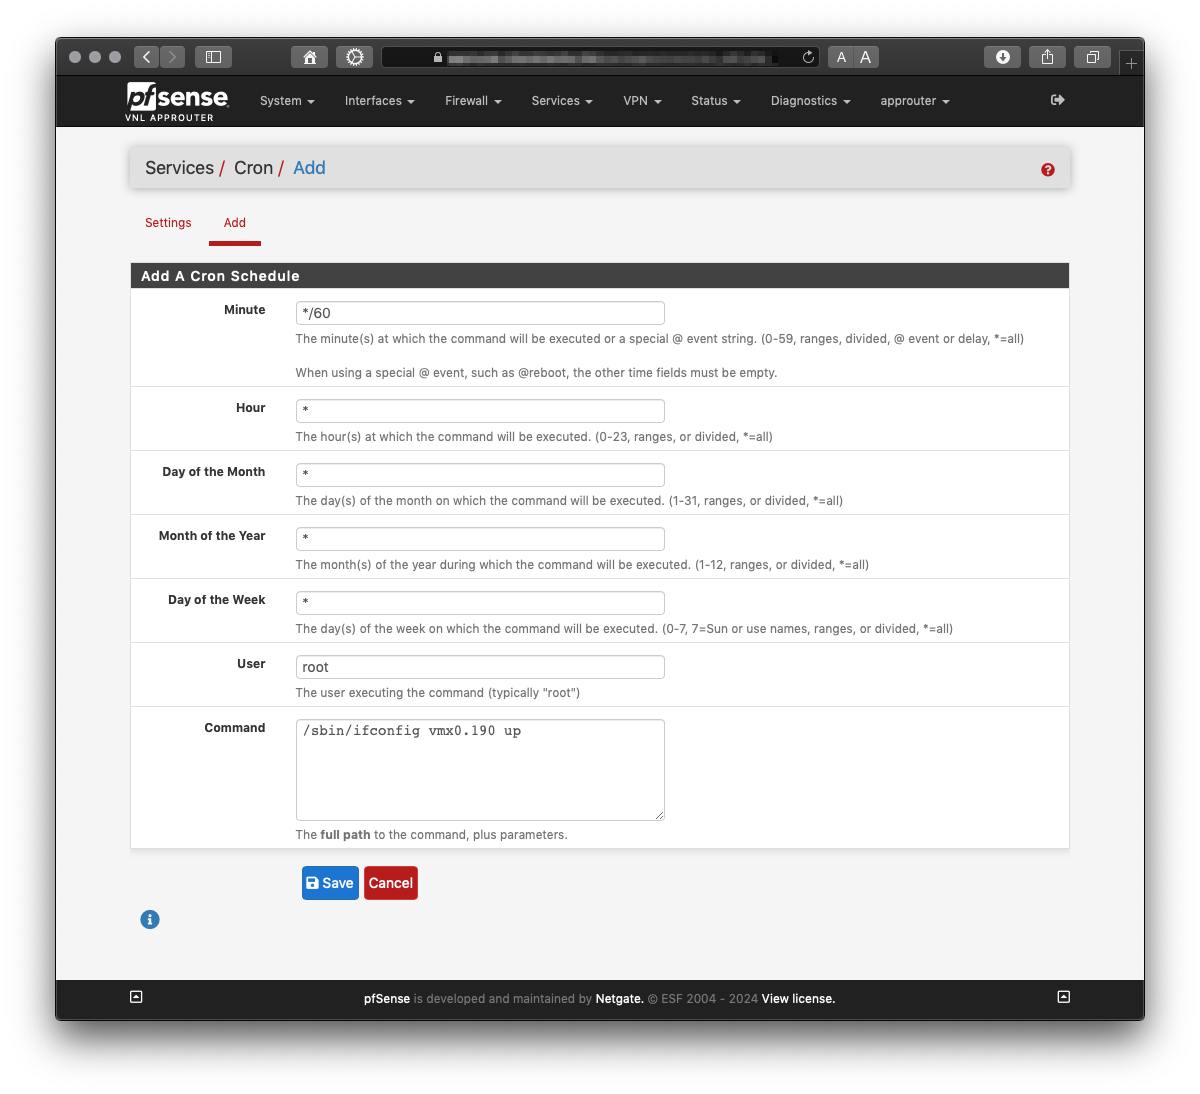
    On pfSense you’ll need to get the cron package if you don’t have it already.

    pkg install -y pfSense-pkg-Cron from the CLI should do it.

    There’s no ifup in pfSense’s xBSD. So, next best thing:

    which ifconfig/sbin/ifconfig

    List interfaces:

    ifconfig | grep -Eio '^(\w|.|\d)+'

    Build command:

    */60 * * * * /sbin/ifconfig vmx.190 up

    And now you’re done. Kinda… you still need to adjust timing if the re-up is indeed disruptive, you can fast forward to it by setting a really short time to test. If the networks stutters, you’ll have to test how low does your authentication last. The easiest way to do it is by starting a ping to a public DNS server or some other server that won’t flag/block you for abuse or something. Do it before you do a manual interface restart so it’s logged in the ping. Don’t forget to check it from time to time because the sequence restarts after a while.

    1. I don’t (and I won’t ever) recommend software that expires unless there’s an excruciatingly good reason for it. Convenience is never a reason. ↩︎
    2. pfSense, OPNsense ↩︎
    3. except not personal but more or less exactly the opposite: public. ↩︎
    4. as in visitors, guests, users. HTTP clients, FTP clients, VoIP clients, etc. ↩︎

  • Fix FCKeditor/Ckgedit image upload

    Fix FCKeditor/Ckgedit image upload

    While on the CLI, it’s assumed you’re root.

    I was having trouble uploading images, strangely enough after I fixed it I realized I forgot to take a screenshot of the error, so I tried to unfix it but it guess it’s gone for good. Anyway, according to my search terms the error read something like: “Error creating folder * (mkdir(): File exists)”. Where “*” is a wildcard for a file path which would make it harder to find results otherwise.

    It showed way too many results, apparently this is a common PHP error. Prefixing my search with the word “dokuwiki” narrowed it down and soon I find half the answer I was looking for.

    Apparently the media folder locks down mod_authz_host-based access with an .htaccess file. What is mod_authz_host ? It simply means “Group authorizations based on host (name or IP address)” according to the HTTP Server Project‘s Module Index. In other words, you cannot request the files directly since your request would be coming from a system—which has an IP address.

    However, requests for the filesystem coming by other means, such as processes running on the server (like PHP), can still get them and present them differently to the client (the browser).

    Regardless, FCKeditor/Ckgedit can bypass this by symlinking the media directory (ref/data/media ref is my DokuWiki root) into FCKeditor/Ckgedit’s own file structure at ref/lib/plugins/ckgedit/fckeditor/userfiles. Filesystem-wise, symlinking immediately grants the symlinked location 777 permissions, and I believe they can’t be changed. (I’ve had mixed results attempting this and, in the cases I’ve been successful, the change is only recognized by some systems, not all.)

    UPDATE 1

    I mean… Only a day passed when I found out symlinks can indeed change ownership. Seriously!—Every time I say something I prove myself wrong the next minute. You should not believe a word written in here. You use the -h short option in both chmod and chown, BTW, the long option is --no-deference only in chown. I think chmod doesn’t have a long option for this. But why should you believe me!? 😛

    UPDATE 2

    Never mind. That (chmod) only seems to work in macOS. I’m testing systems, so far on Fedora 36, Red Hat Enterprise Linux 8.6, Ubuntu 20.04.5 LTS can’t be done. On macOS 10.13 and FreeBSD 13.0 can be done. chown works everywhere though. See? This is what I’m talking about; just a minute later. I didn’t test more system bc suddenly I’m blanking on their (host)names for some reason. I have at least one Debian (version), one Zorin OS, I’m not so sure about FreeBSD, usually they’re pretty uniform on their versions…

    If you remove the symlink from FCKeditor/Ckgedit’s directories, then the next time you summon the UI to upload an image it automatically recreates it as a regular directory which of course it won’t have access to your existing data which means you’ll end up duplicating it. If you recreate the symlink on your own the error returns.

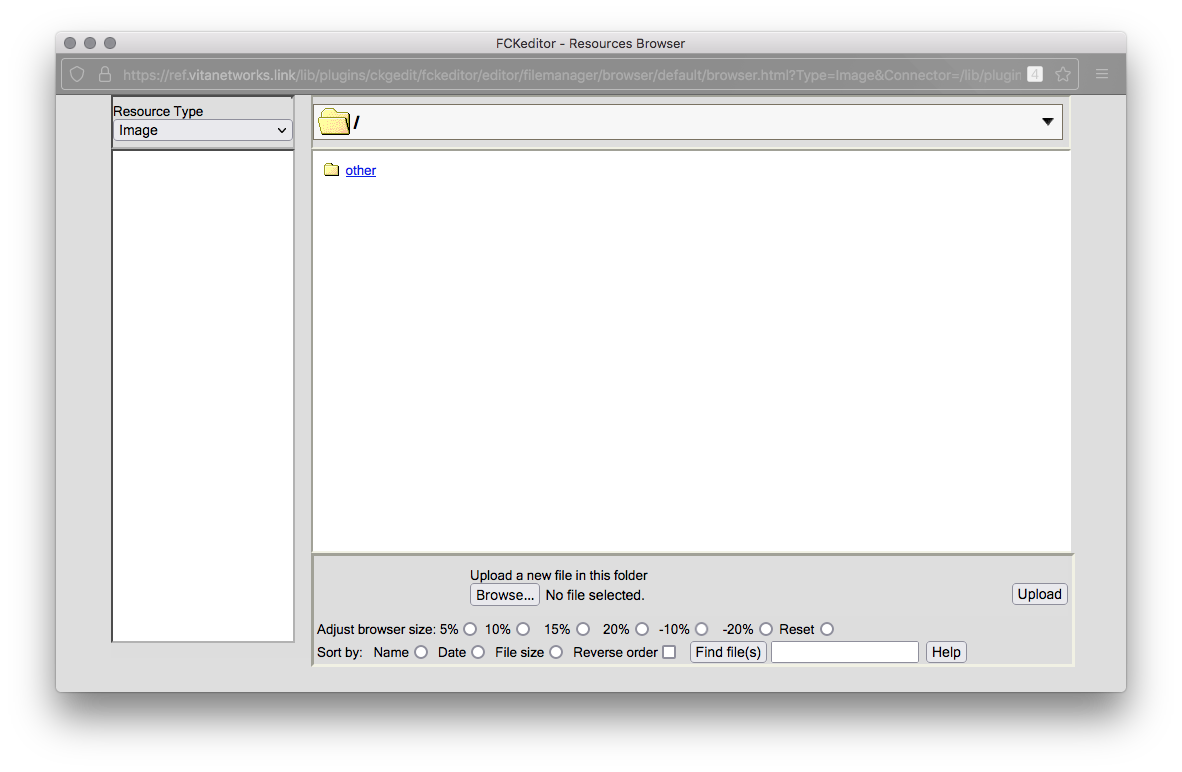
    When FCKeditor/Ckgedit recreates its image directory as a directory, not a symlink. other was automatically added because of the namespace I was in but otherwise it’s an empty file structure.

    According to the articles I read, all you have to do is copy one of the .htaccess samples from the userfiles directory mentioned earlier, .htaccess.security, into the real media directory and you’re done.

    However, I did and I wasn’t.

    The sample file’s content is:

    <IfModule mod_authz_host>
        Require all denied
    </IfModule>
    <IfModule !mod_authz_host>
        Order allow,deny
        Deny from all
    </IfModule>
    
    <FilesMatch "\.(gif|jpe?g|png)$">
    <IfModule mod_authz_host>
        Require all granted
    </IfModule>
    <IfModule !mod_authz_host>
        Order allow,deny
        Allow from all
    </IfModule>
    </FilesMatch>
    
    Options -Indexes

    Now, stop me if you’ve seen this before, specifically the last line.

    Right?! That’s what I thought too. It’s like we’re twins. We should definitely start calling each other “bitch” and “dumb slut”. Hashtag BFFs.

    So bitch…

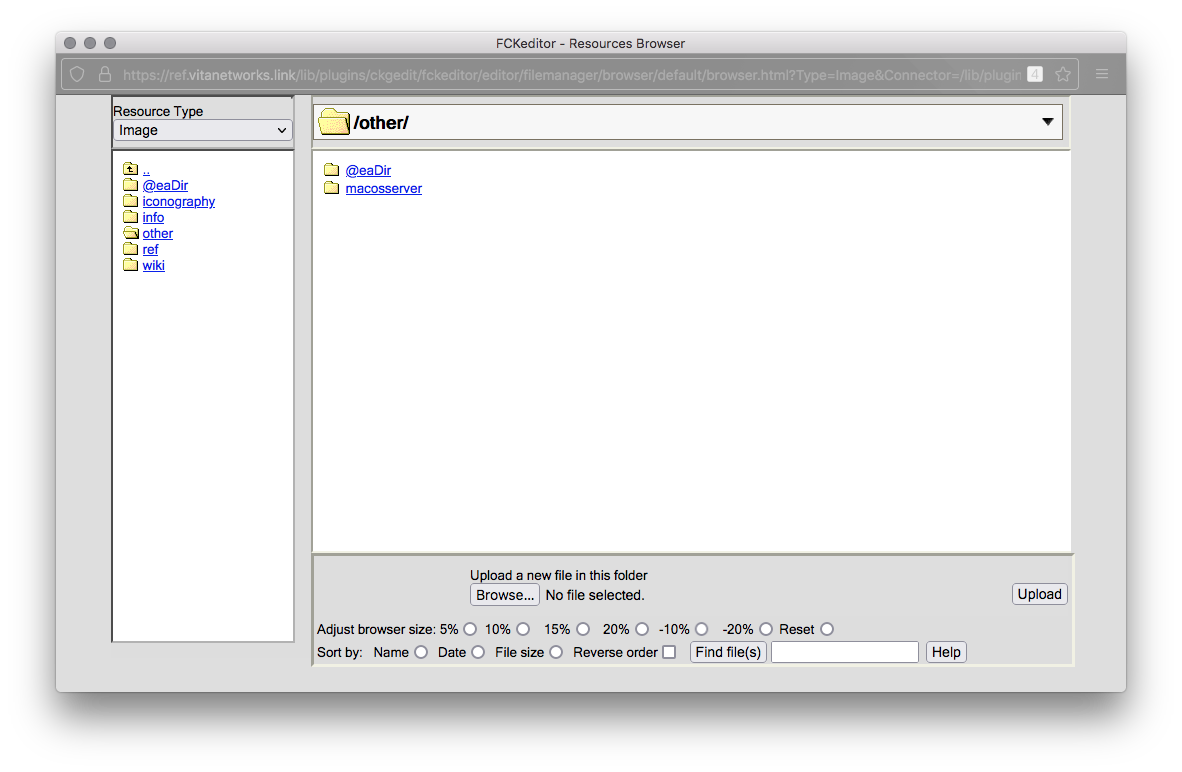
    I added on it +FollowSymLinks, I tried again et voici ci-dessous !

    Now showing more stuff, it still looks emptyish because there isn’t much on the wiki.

    I also augmented the file extensions allowed to be served:

    <IfModule mod_authz_host>
        Require all denied
    </IfModule>
    <IfModule !mod_authz_host>
        Order allow,deny
        Deny from all
    </IfModule>
    
    <FilesMatch "\.(gif|jpe?g|png|svg|pdf|mov|mp4|mp3|m4a|ai|psd|aiff|tiff|pxm)$">
    <IfModule mod_authz_host>
        Require all granted
    </IfModule>
    <IfModule !mod_authz_host>
        Order allow,deny
        Allow from all
    </IfModule>
    </FilesMatch>
    
    Options -Indexes +FollowSymLinks
    

    Getting ambiguities out of the way

    The contents of ref/data/media/.htaccess is a copy of ref/lib/plugins/ckgedit/fckeditor/userfiles/.htaccess.security:

    <IfModule mod_authz_host>
        Require all denied
    </IfModule>
    <IfModule !mod_authz_host>
        Order allow,deny
        Deny from all
    </IfModule>
    
    <FilesMatch "\.(gif|jpe?g|png|svg|pdf|mov|mp4|mp3|m4a|ai|psd|aiff|tiff|pxm)$">
    <IfModule mod_authz_host>
        Require all granted
    </IfModule>
    <IfModule !mod_authz_host>
        Order allow,deny
        Allow from all
    </IfModule>
    </FilesMatch>
    
    Options -Indexes

    At this point I had gone rogue and I had edited the file directly which is advised not to do. However, I left the last line untouched.

    The contents of ref/lib/plugins/ckgedit/fckeditor/userfiles/.htaccess is:
    this is the important file ⤵︎

    <IfModule mod_authz_host>
        Require all denied
    </IfModule>
    <IfModule !mod_authz_host>
        Order allow,deny
        Deny from all
    </IfModule>
    
    <FilesMatch "\.(gif|jpe?g|png|svg|pdf|mov|mp4|mp3|m4a|ai|psd|aiff|tiff|pxm)$">
    <IfModule mod_authz_host>
        Require all granted
    </IfModule>
    <IfModule !mod_authz_host>
        Order allow,deny
        Allow from all
    </IfModule>
    </FilesMatch>
    
    Options -Indexes +FollowSymLinks

    If you deleted the symlink too, to recreate it, in the command line navigate to your media folder using the pushd command instead of cd.

    If you deleted the symlink too, to recreate it, in the command line navigate to your media folder using the pushd command instead of cd. Why? Because it prints the last directory you were each time you change to a new one. You can copy and paste it.

    Objects are closer than they appear

    The last step is fixing permissions. In Debian upstream, httpd’s default user is www-data:www-data. In Fedora upstream it’s apache:apache. I don’t know what’s the user on xBSD, but just list the files in other directories of your DokuWiki install with the long format option (ls -l) and you should be able to infer it from it. Now, assuming you’re on the last directory we were (image above), run:

    # replace user:group with your distributions respective values
    chown -fR user:group "$(pwd)"
    
    # you can't really change this on symlinks but it's just for housekeeping (the other files)
    # '"$(pwd)"' is your current path, '-fR' includes the contents said path no Qs asked
    chmod -fR 755 "$(pwd)"

    Last notes

    Credits/Sources

    The first hint I got, I found it on: https://forum.dokuwiki.org/d/237-fatal-error-mkdir-data-locks-file-exists, I think. Honestly I’m not sure because it looks very different now, however the site is correct and it lead me to http://www.mturner.org/fckgLite/doku.php/file_browser_install#image_display_issue_using_direct_path and http://www.mturner.org/fckgLite/doku.php/media#security_and_the_media_directory.

    I doubt this people will ever see this, but if some permalink magic is at work and it finds its way back, I’d like to thank them for getting me on the right path…literally.

    Personal notes

    I’ve observed that normally it’s expected for the website files to be on the web server itself. I expect to be hacked, to fuck up my server, to delete all the directories using something irreversible like rm -fR, or to do some other stupidity as I often do, thus as a safety measure my server’s files are on NFS mounts which are symlinked kinda heavily. Even if I delete things from the CLI, the backend servers are taking both constant backups and snapshots automatically of the files letting me revert from stupidity, plus you know a bitch likes to serve that chunky media which like all good dicks, has trouble fitting into my tiny disk, a mount. hashtag wink, is necessary.

    Point is, It might be the reason why the guides above didn’t work, though the guides themselves use symlinks, so it could’ve been an oversight as well. IDK.

    Messages from Sensei Vita’s Temple

    Non-ESA ESA-vested pet (17:00 PST) or ESA-vested bondage partner (17:30 PST) videoconf frozen yogo yoga with resident Israeli-American instructor Terry Shirah York is available on Microsoft Teams again. The Azure support staff has assured us that the service will be very reliable as long as it’s not raining, Friday or Saturday.

  • ln tip (making symlinks)

    ln tip (making symlinks)

    ln is such an important utility, endlessly useful, and really not hard to use or understand at all, except for when you haven’t used it in a while and check the manpage for its syntax then that’s when shit hits the fan.

    It is confusing at best. In my case, the fact that wasn’t straightforward from the beginning, even after “getting it”, the experience of the confusion is what I remember instead of the syntax, and there’s always a lingering uncertainty that kicks in.

    This is from the manpage:

    SYNOPSIS
           ln [OPTION]… [-T] TARGET LINK_NAME
           ln [OPTION]… TARGET
           ln [OPTION]… TARGET… DIRECTORY
           ln [OPTION]… -t DIRECTORY TARGET…

    TARGET is immediately easy to understand, so is LINK_NAME, and if it was left there it would’ve made a world of difference but then DIRECTORY is introduced, introducing ambiguity with it. Granted, if you keep reading a little further you may catch the explanation, but realistically, how many stop to read the description and don’t go straight to skim the options? And when the five second research fails: it’s a web search.

    This may seem obvious to many, it’s fine, it’s not for you. It’s for those scatterbrains, the ADHDs and OCPDs like me that interpret an non-definitive answer as open, where the non-denied what ifs that create more questions. It can be frustrating.

    I’m not going to teach you how to use ln but rather a simple mnemonic that might come in handy: treat it like cp.

    ln is like copying files, only without copying their data. cp‘s syntax, is among the most memorable in the CLI because it’s one of the first commands you learn along with mv which also has the same syntax ordering: SOURCE → DESTINATION. Works for every case.

    Symlinks:

    ln -s existing-thing-or-source new-thing-or-destination

    Hard linking directories is complicated. In syntax: instead of having to define if a directory plays source, destination or object, just maybe think that without the s there’s no plural, so you [hard] link individual files with(out) it:

    ln existing-thing-or-source new-thing-or-destination

    And the last variation you may, but not really since you can always rm before ln, is -f, which means the same as it means in plenty of other commands:

    ln -sf existing-thing-or-source forced(overwritten)-new-thing-or-destination

    That’s it. More on it risks making it confusing again. If you do need more advanced things, perhaps you should really carefully read that manpage.

    Don’t forget there’s videoconf pet meditation this afternoon at 17hrs.

    Remember: ln = cp without the bulk.

    SV.

  • Thin Eager-Zeroed vDisks

    Thin Eager-Zeroed vDisks

    Caveats

    Only works on VMFS-type datastores. If your VMs are on NFS you have to Storage vMotion them to a VMFS datastore, vMotion itself may be able to thin the disk. Consolidate disks, delete all snapshots, consolidate again if necessary. Once you have decluttered your disks, proceed, otherwise I promise you will regret it. Shut down heavy disk-hitter VMs before doing this, not during (unless you unplug their virtual power cord AKA turn off). And avoid creating heavy network traffic during the process. It’s not that long, fortunately.

    Prepare the VMs

    Get the SysInternals tools on Windows to zero out your disks.

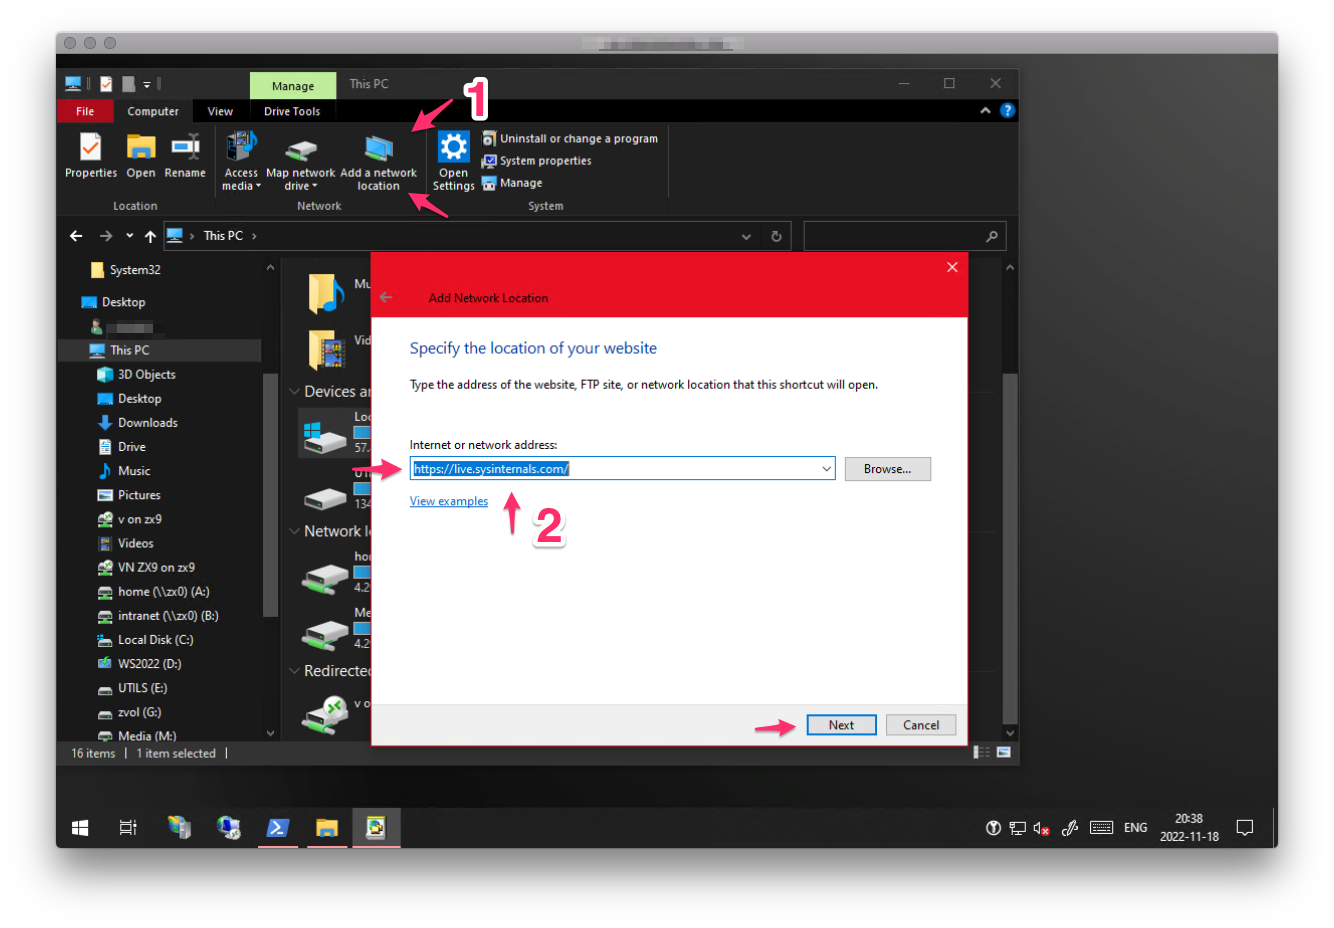
    On Windows you can do it without installation or even downloading anything, just mount their WebDAVS repo directly on file explorer, you’ll hav¨-´
    e to open TCP:443 for the host live.sysinternals.com where you need to connect.

    ⇧-right-click on any free space among the files listed and select to open a PowerShell window. On older Windows it says a Command Prompt window if you haven’t change or doesn’t have the taskbar setting Replace Command Prompt with Windows PowerShell in the menu when I right-click the start button or press Windows  key+X, ain’t that a mouthful.

    Run for each local disk .\sdelete -z C:, replacing C: for the next in the list, of course.

    On Linux it will vary by the million format options you have. VMware cites the example dd if=/dev/zero of=/mounted-volume/zeroes && rm -f /mounted-volume/zeroes. I’m not an expert so I’ll stay away from it.

    What I will say is that personally I’d never try it on disk formats that double as volume managers, e.g; ZFS, Btrfs. Try other ways of rescuing whatever you need to rescue. Linux doesn’t treat you like a thief, collecting identifiers of whatever is identifiable to prevent you from moving your OS like Microsoft is with Windows–or you know… another less logical reason. It’s relatively trivial to rsync sensitive data and system files on Linux. Taking away the giant disk from the VM and mounting it alongside a new smaller disk on another Linux VM should let you cp/dd/rsync/etc the data.

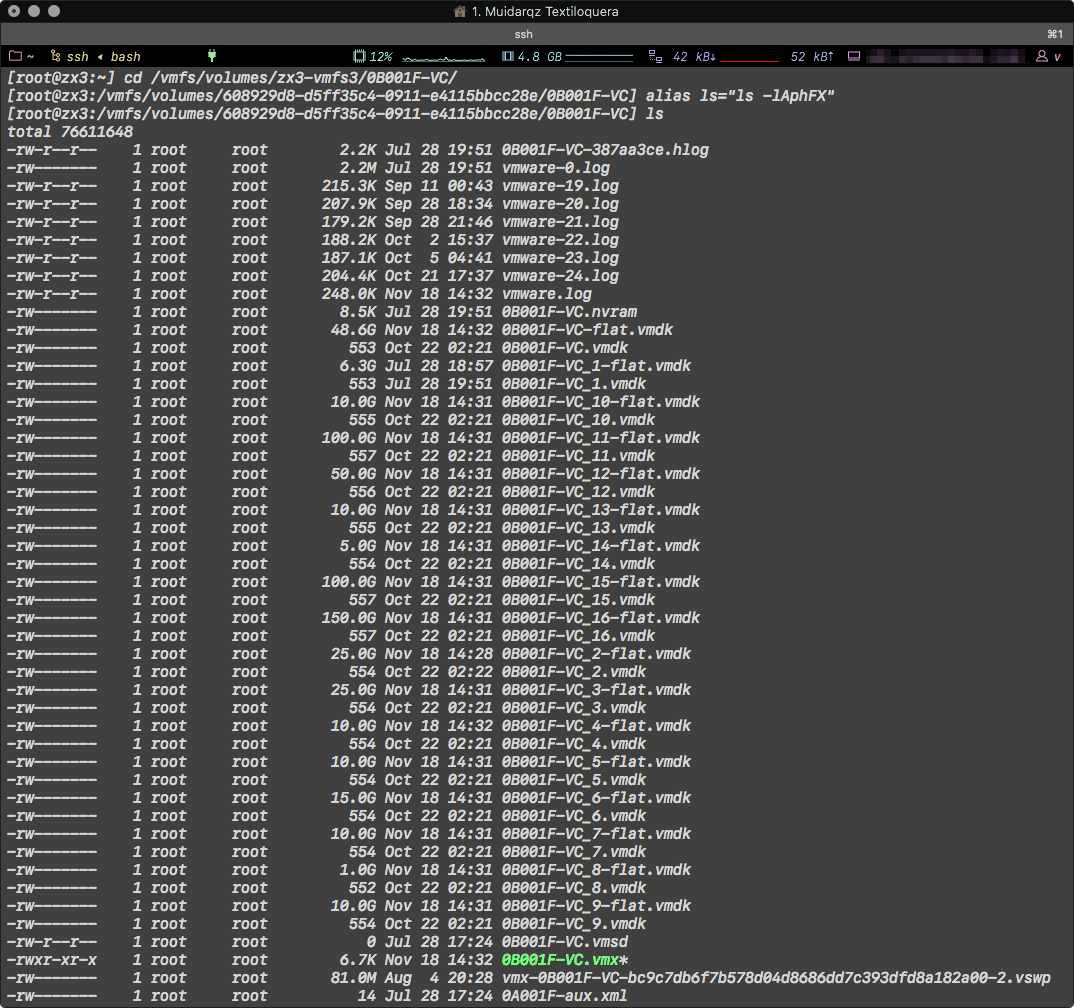
    SSH or open you ESXi host’s console (on the yellow console press either ⌥F1 or ⌥F2 to show it) then navigate to your VM. Start by listing the contents of /vmfs/volumes/. Identify your datastore, and navigate to your VM’s directory. If you renamed the VM in the past without using Storage vMotion, it’s very likely to have its old name. vSAN data is completely different to what shown on vCenter, it’s best not to mess with vSAN directly, if you must insist, take the VM to a regular VMFS datastore using vCenter to queue the job.

    Create a temporary ls alias to sort through things quicker, i.e; alias ls="ls -lAphFX".

    As you can see above, there are a ton of files. You need to work on the non -flat.vmdk files only

    Points extra if you guess what very common (in vSphere deployments) VM this is

    The final command you have to run is…wait ! I almost forgot: you must shutdown your VM, preferably properly, and unregister it from vSphere. You can do this on vCenter or ESXi, just watch out if vCenter doesn’t add it back.

    The finally run the command vmkfstools -K disk_name.vmdk. In my case that would be vmdkfstools -K 0B001F-VC.vmdk. Now, for some reason vSphere is very unstable when I ssh in. You’ll never know if it’ll show a broken pipe-something error within minutes or within slightly more minutes. Speaking of…

    It just happpened. Like clockwork.

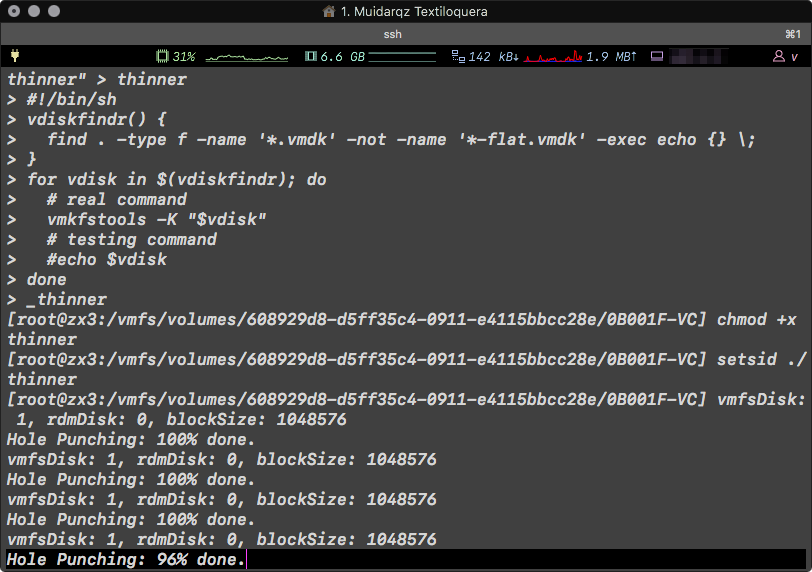
    So, I found a workaround for this: add before the same command, setsid, e.g; setsid vmdkfstools -K 0B001F-VC.vmdk. This executes the command on a separate process entirely instead of a child process from your SSH session, that will take down all child processes with it if it gets terminated. It also means that the command will exit immediately. Though occasionally it prints stuff on screen.

    That’s it. You can exit your session now, grep ps‘s output to see if your task has finished. If you need to work on several disks, you can script it, for instance:

    One of the following commands, the second, creates a script in-line in the directory where you execute it, it makes the script executable and it immediately runs it. The script finds all .vmdk-ending files excluding those ending in -flat.vmdk still using the current directory as the working directory and one at a time “punches out” the zeroed space in the disks.

    The other script, the first one, does almost the same thing as the second explained except that in only prints out the files it would’ve used. Both command write out a script named thinner, meaning one overwrites the over.

    The other difference is that the working one runs in the background

    They need no adjustments, just copy and paste.

    Testing script

    cat << "_thinner" > thinner
    #!/bin/sh
    vdiskfindr() {
      find . -type f -name '*.vmdk' -not -name '*-flat.vmdk' -exec echo {} \;
    }
    for vdisk in $(vdiskfindr); do
      echo "$vdisk"
    done
    _thinner
    chmod +x thinner
    ./thinner

    Job-performing script

    cat << "_thinner" > thinner
    #!/bin/sh
    vdiskfindr() {
      find . -type f -name '*.vmdk' -not -name '*-flat.vmdk' -exec echo {} \;
    }
    for vdisk in $(vdiskfindr); do
      vmksfstools -K "$vdisk"
    done
    _thinner
    chmod +x thinner
    setsid ./thinner
    
    As you can see, though the process is independent from your current session, it will still occasionally print stuff in it. You can disconnect from the server if you wish, it will continue to fun on its own.

    Take a little break, register your VM and power it on

    As soon as it start running, I recommend you run ps | grep vmkfstools and study a little the output. The terminal might interrupt what your typing if the status changes, ignore it and continue as if I hadn’t happened, type in the command without looking at the screen if it’s confusing you to spell. Use only one finger, firmly pressing each key all the way down then releasing it quickly. I sound and looks stupid, but it helps specially when you’re sleep-deprived which is a very common theme when you’re troubleshooting.

    Are you sleepy?

    Maybe take a little disco nap, half an hour makes a huge difference in concentration, play some music, smoke some meth, I don’t know. Don’t let yourself get bored because it leads to data loss.

    In regular Linux, this command would normally find itself in the list, but ESXi is weird. If you’re doing a batch of vdisks, the PID will keep changing, don’t worry about, all I wanted you to do it to learn to be able to tell the difference when the job is running and when it’s not.

    And, that’s it. All you have to do is keep on checking from time to time.

    It takes a while but not as much as zeroing out storage. Once it’s finished register again the VM, the quickest browsing the datastores on ESXi then after you find the VM’s location right-click the VMX file and select Register VM. This bypasses the whole assistant you’d get otherwise and your previous settings are preserved except for a few like automatic power on. You machine should be now available on the VMs view, powered off.

    Hopefully this wasn’t too confusing. If you need help, don’t hesitate to ask. Just contact me however you can, I’m sure you’ll figure out how. I can’t write my addresses because of bots, sorry.